V-Ray Denoiser | VRayDenoiser
This page gives information on the V-Ray Denoiser Render Element.
Page Contents
Overview
The V-Ray Denoiser removes noise from other render elements. This render element applies a denoising operation to it after the image is completely rendered out via normal means. The denoising operation detects areas where noise is present and smooths them out. Images can also be denoised using the standalone vdenoise tool included with the installation of V-Ray for 3ds Max.
Because the V-Ray Denoiser operates on other render elements (such as Beauty | RGB_Color) rather than being part of the rendering process itself, the denoising operation does not require rerendering of the scene. The Denoiser settings can be quickly changed and tested over and over to improve the result.
The V-Ray Denoiser has three preset options for its settings; Default, Mild, and Strong. Parameters can also be adjusted directly by selecting the Custom preset.
When rendering, the V-Ray Denoiser automatically adds a few render channels in the V-Ray Frame Buffer which are required by the denoising algorithm. Some of them are standard render channels like the diffuse filter color, the reflection filter color etc. A few special channels are also generated:
-
The effectsResult channel holds the image that results after denoising operations and lens effects are executed over the rendered image. The RGB Channel button in the VFB will toggle between the effectsResult and original RGB color channels.
-
The noiseLevel channel is the amount of noise for a pixel as estimated by the V-Ray image sampler.
-
The defocusAmount channel is non-black when depth of field and motion blur are enabled and contains the estimated pixel blurring in screen space.
-
The VRayDenoiser channel contains the result of the noise removal. This channel appears in the VFB only if mode is set to Show denoiser result channel.
The denoiser can only work with the new variance-based adaptive sampling method introduced in V-Ray 3.30. *
Currently the scene can contain only one VRayDenoiser Render Element. Future versions of V-Ray will support multiple VRayDenoiser Render Elements with different settings.
UI Path: ||Render Setup window|| > Render Elements tab > Add button > VRayDenoiser
Parameters
This render element is enabled through the Render Elements tab of the Render Setup window in 3ds Max and displays its parameters in a rollout at the bottom of the window:
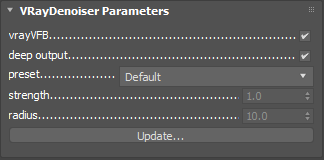
vrayVFB – When enabled, the render elements appear in the V-Ray Virtual Frame Buffer.
deep output – Specifies whether to include this render element in deep images.
preset – Offers presets to automatically set strength and radius values. For more information, see the Denoising Presets example below.
Default – Applies a mid-level denoising.
Mild – Applies a more subtle level of denoising than the Default preset.
Strong – Applies a stronger level of denoising than the Default preset.
Custom – Allows the strength and radius parameters to be set to custom values.
strength – Determines how strong the denoising operation will be.
radius – Specifies the area around each pixel to be denoised. A smaller radius will affect a smaller range of pixels while a larger radius will affect a larger range, which will increase the noise removal.
Update – Reapply the denoising operation when the required render elements are already present in the V-Ray frame buffer. The elements can be either generated from a render operation in 3ds Max, or by loading a multi-channel .vrimg or OpenEXR into the V-Ray frame buffer. Use this button to apply denoising again after settings on this rollout have been changed.
Advanced parameters
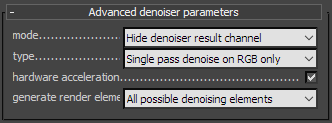
mode – Specifies how the results of VRayDenoiser will be saved.
Hide denoiser result channel – The VRayDenoiser channel is not present separately in the VFB. The effectsResult channel is generated with the denoised image.
Only generate render elements – All render elements required for denoising will be generated but a denoised version of the image will not be computed, and the VRayDenoiser and effectsResult render elements will not be generated. Use this option if you plan to denoise a sequence of images using the command-line denoising tool and do not want to spend time on denoising during the actual rendering process.
Show denoiser result channel – The VRayDenoiser and effectsResult channels are generated.
type – Specifies whether to denoise only the RGB Color Render Element, or others as well.
Single pass denoise on RGB only – Does a single pass at denoising on only the RGB Color Render Element, using other elements like the diffuse filter only to guide the denoising process. This method is better at cleaning up noise, but may loose small texture details or may blur too much areas of the image where multiple effects are visible at the same time (f.e. reflections and refractions through glass materials). This mode requires fewer additional render elements and you can use the Depending on denoising type setting of generate render elements to generate just the needed ones for this mode.
Denoise render elements separately – Denoises the lighting, global illumination, specular, reflection, refraction and atmosphere render elements separately and combines them into one denoised version of the RGB image. This method preserves texture details better, but with low settings might fail to clean up some types of noise. Note: This mode can only work correctly if no color mapping is applied to the render, so that the mentioned render elements add up correctly to the RGB image.
hardware acceleration – Uses the OpenCL version of the denoiser, if possible. It will fallback to the CPU version if OpenCL is not available.
generate render elements – Specifies which render elements to add to the VFB automatically when rendering:
Manual – Adds only the noiseLevel and defocusAmount render elements; the rest must be added manually.
Depending on denoising type – Adds only the elements needed for the current denoiser type (single pass or by render elements). Single-pass denoising requires fewer render elements and choosing this option can save RAM and disk space, but it will not be possible to switch to per-element denoising.
All possible denoising elements – Adds all elements that could be required by the denoiser and allows switching between different types.
Suggested Render Settings
While the denoiser can be quite effective at removing noise, it is not perfect; very noisy images can lead to artifacts and loss of image detail. For most scenes, use Bucket or Progressive image sampler with the Noise threshold set to 0.05 or lower. Additionally, the denoiser works best when the noise levels across the image are similar (the noiseLevel render channel is uniform grey), so using very low sampling is not recommended.
When rendering animations, enabling the Lock noise pattern option in the Global DMC rollout generally improves the results. Using the Standalone vdenoise Tool on the rendered frames can additionally improve the quality of the animation.
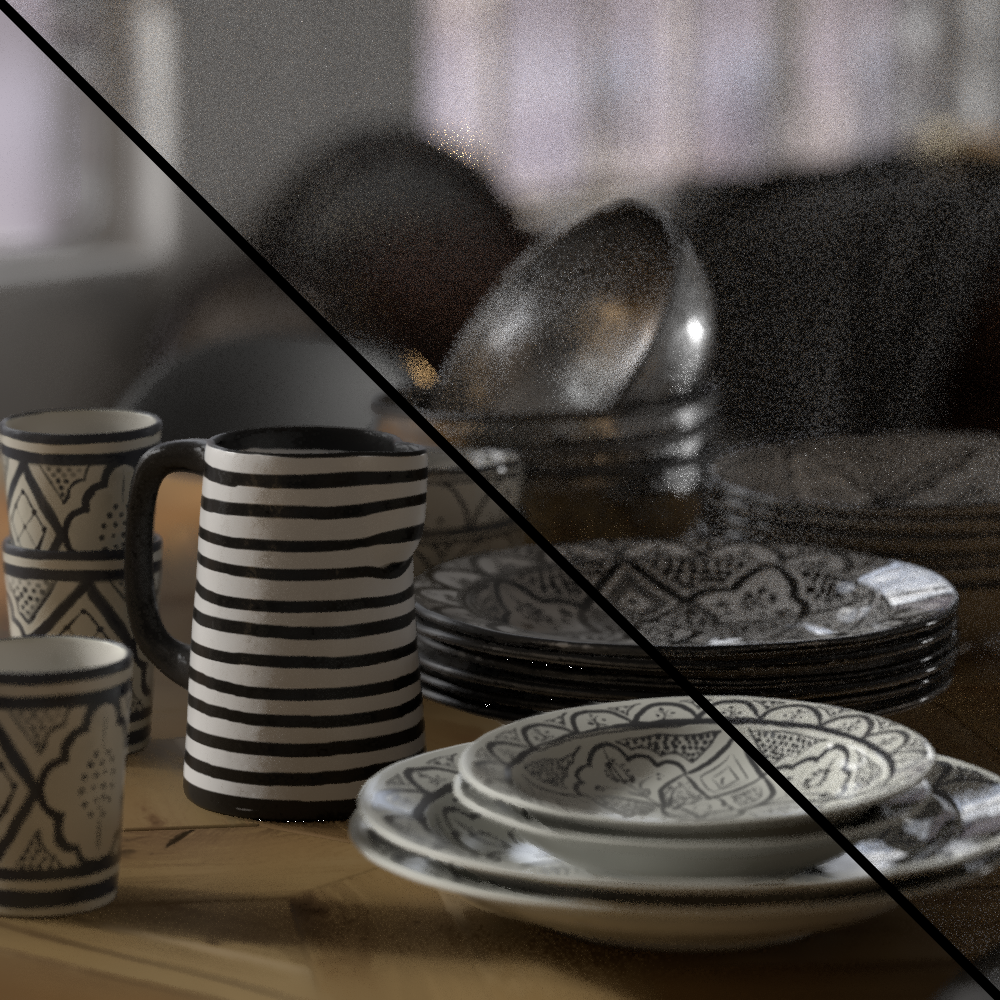
Example: Denoising Presets
The example below illustrates how VRayDenoiser works using the presets. A purposely noisy render was set up using the Progressive Image Sampler Type with Render Time set to only 3 minutes to leave plenty of noise in the render. To better see the noise level in each image, click the image to see it at full size.

RGB Color Render Element prior to denoising
VRayDenoiser Render Element (Mild Preset)

VRayDenoiser Render Element (Default Preset)

VRayDenoiser Render Element (Strong Preset)

VRayDenoiser Render Element
(Custom Preset: strength: 5, radius: 10)

The VRayDenoiser Render Element
(Custom Preset: strength: 10, radius: 20)
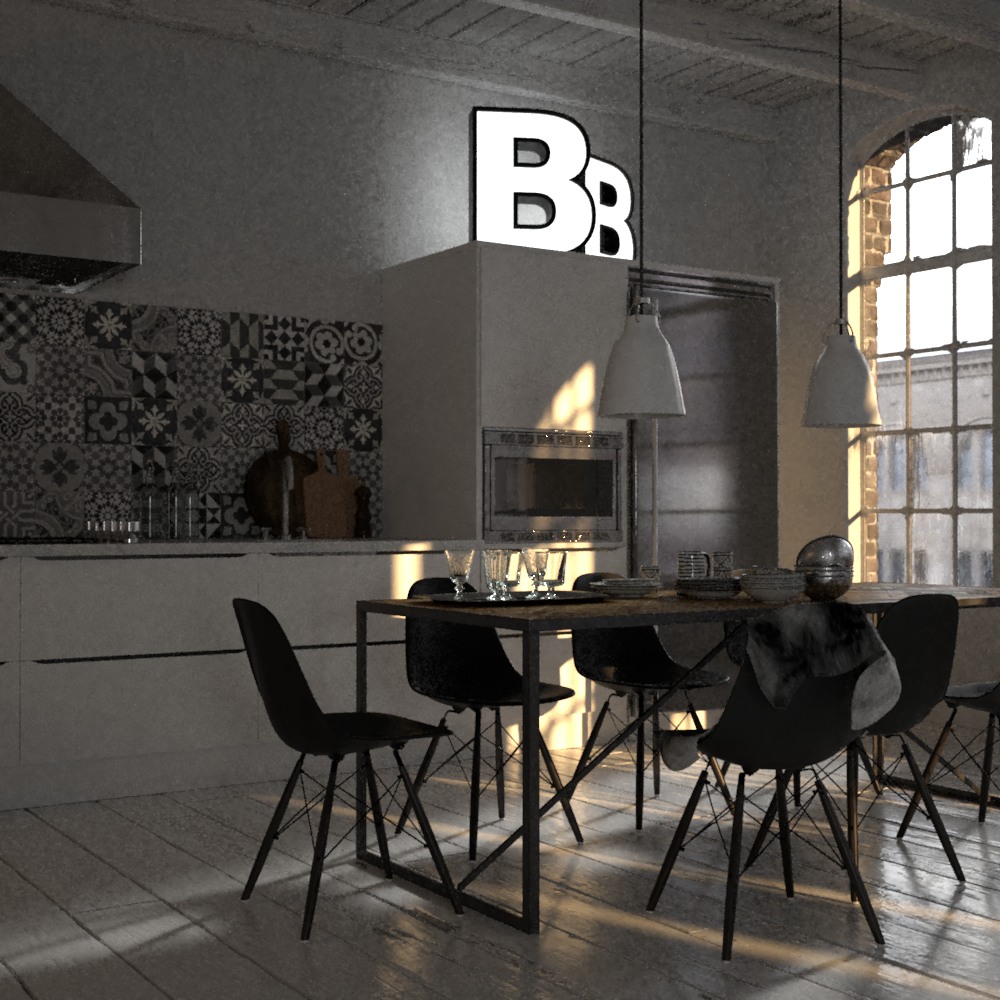
Example: noiseLevel Render Element
The noiseLevel Render Element shows where areas of noise have been detected in the scene. White areas have the most noise, black areas have no noise, and gray areas have varying levels of noise.
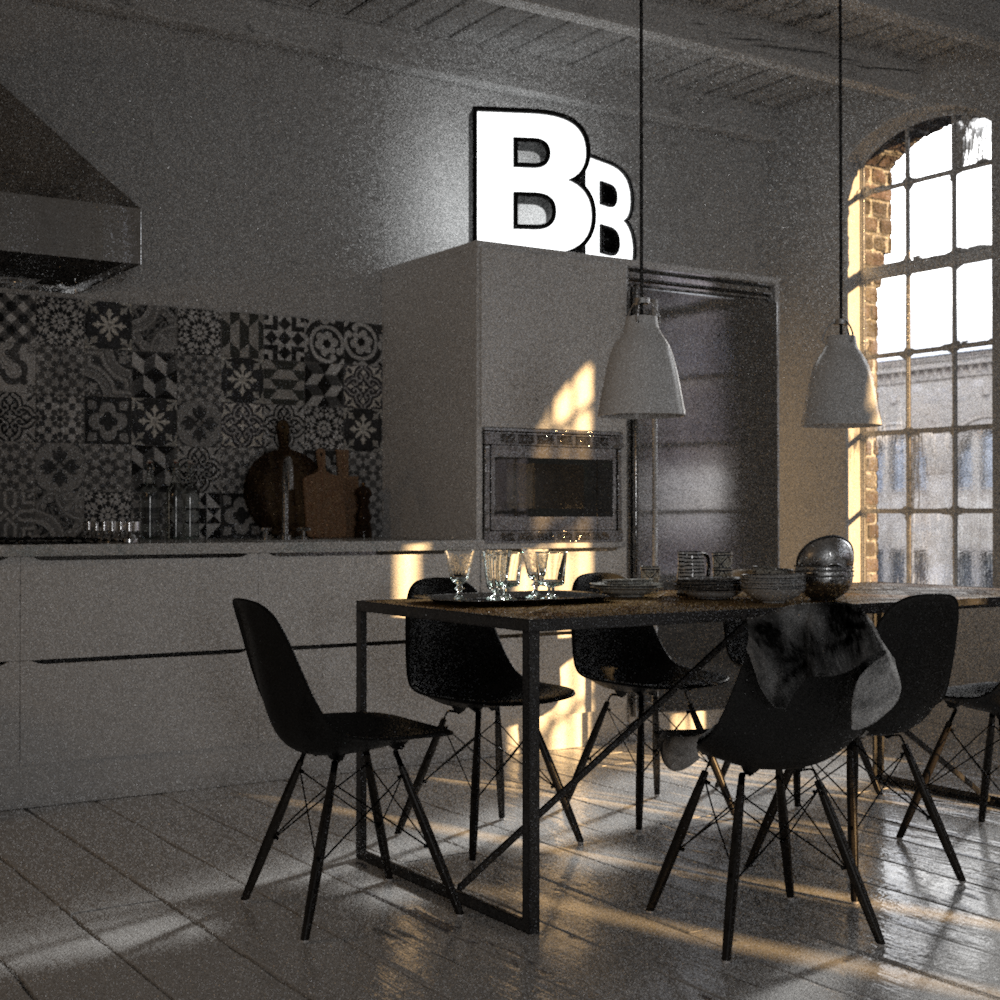 RGB Color Render Element prior to denoising
Note: Areas around the microwave oven have high-contrast noise.
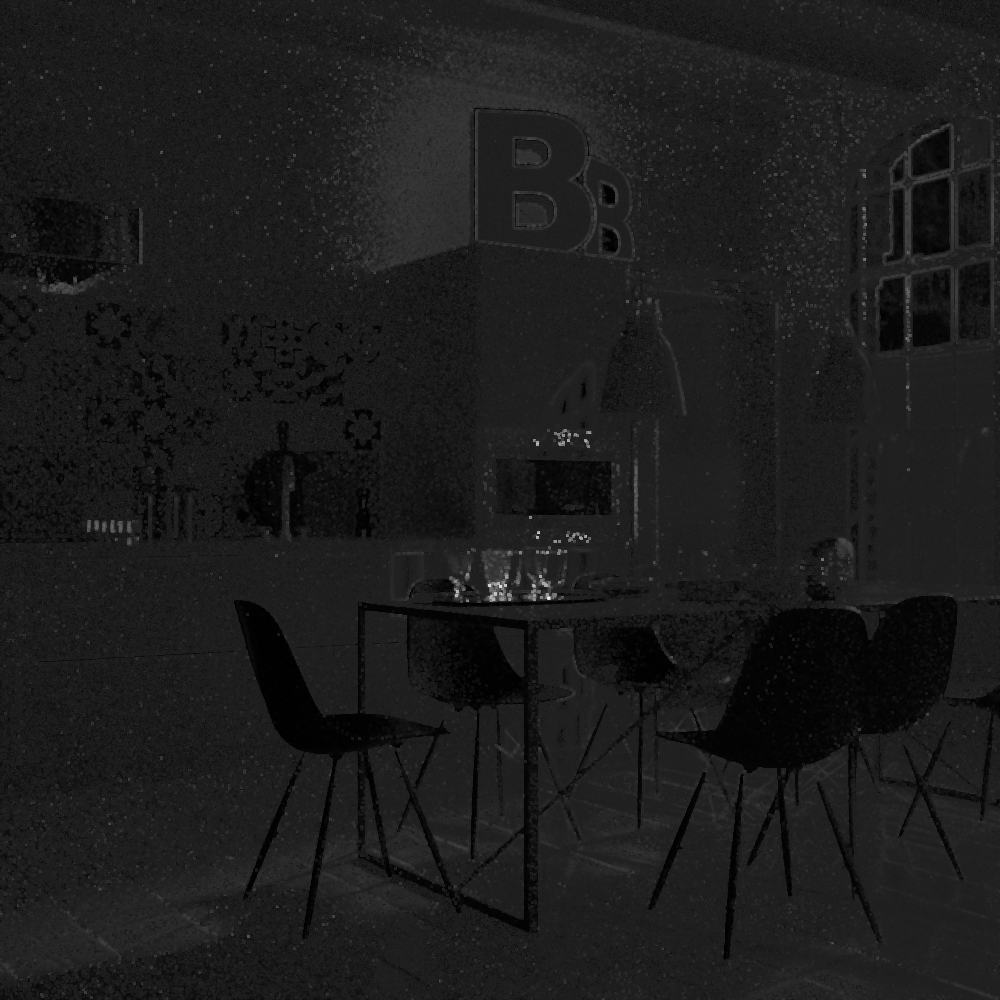 noiseLevel Render Element
Denoised RGB Color Render Element
Denoising Animations
When denoising animations, it is recommended to use the Standalone Denoiser Tool. Unlike the denoiser integrated in the UI, the standalone tool can do frame blending for animations, which reduces flickering. The integrated denoiser only works on the rendered frame and does not take the next and previous frame(s) into account, like the standalone tool does.
To denoise an image sequence with vdenoise run the following command:
vdenoise -inputFile="path\to\sequence_????.extwhere the question mark (?) replaces the digits in the sequence's file names.
For example, if the images in the sequence are named anim_0001.exr, anim_0002.exr, etc. and are located in the folder c:\renderoutput, the full command will be:
vdenoise -inputFile="c:\renderoutput\anim_????.exrWhen that command is run, the sequence is read and for each frame, the specified number of adjacent frames are also considered. A new output image is then written for each frame.
Recommended settings:
-
mode set to Only generate render elements.
-
Render output set to vrimg or multichannel exr.
File Names of Saved Channels
As expected, channels will keep their names as displayed in the VFB when saving them to a single .vrimg or .exr file (using the V-Ray raw image file option from the Frame buffer rollout or the Save all image channels to single file VFB button). The same channel names will be appended to the files when you use the VFB button Save all image channels to separate files.
However, using the Save separate render channels option from the Frame buffer rollout to save all layers as separate files will save the effectsResult channel to a file with the text RGB_color appended to its name, and the RGB channel as origRGB instead.
Notes
-
Image denoising takes place after the frame has been rendered and will not show up until all rendering has finished.
-
Textures or materials such as VRayStochasticFlakesMtl that could be considered to have a purposely noisy look will not be considered "noisy" by VRayDenoiser, and will not be affected by the noise removal process.
-
You can enable the new variance-based adaptive sampling method with the following MAXScript command: renderers.current.twoLevel_adaptiveMethod=1