Smoke Opacity Rollout
This page provides information on the Smoke Opacity Rollout for the Volumetric Options.
Page Contents
Overview
This rollout controls the transparency part of the volumetric shader. By default it affects only the smoke, but if Fire Opacity Mode in the Fire rollout is set to Use Smoke Opacity, it affects the fire as well.
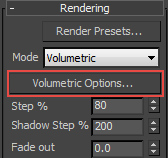
UI Path: ||Select V-Ray Volume Grid|| > Modify panel > Rendering rollout > Volumetric Options... button > Volumetric Render Settings window
Parameters
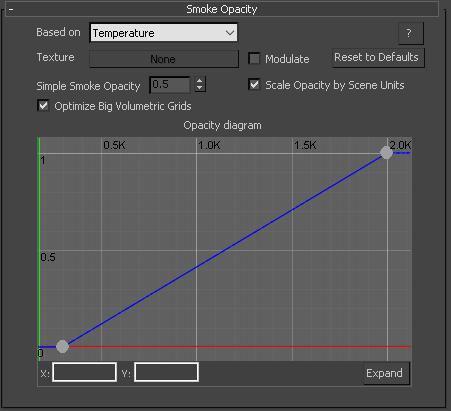
Based on – The channel that determines the smoke density. The default option is simple smoke, which produces the smoke channel without curve transformation.
Simple smoke – Uses the smoke channel with a predefined analytical formula.
Temperature – Uses the temperature channel.
Smoke – Uses the smoke channel.
Speed – Uses the magnitude of the velocity channel.
Texture – Uses an external texture map.
Fuel – Uses the fuel channel.
Texture – If the Based on parameter is set to Texture, or if Modulate is enabled, this slot specifies the texture to be used.
Modulate – When Based on is not set to Texture and this option is enabled, the Texture slot is enabled and the color is multiplied by the texture in the Texture slot.
Simple Smoke Opacity – When the Based on parameter is set to Simple smoke, this value is used as an opacity multiplier.
Scale Opacity by Scene Units – When enabled, the opacity per unit length will remain constant when changing the Grid resolution. Therefore, the larger the unit scale it, the denser the smoke will appear in renders and vice versa. This option is Off for imported Field3D and OpenVDB cache files. Note: When disabled, Phoenix caches simulated at higher grid resolution will appear more opaque than the same simulation at a lower resolution.
Optimize Big Volumetric Grids – Helps render scenes with caches above 25 Million cells faster. If using Progressive rendering or if there are a lot of simulators in the scene, and you want your render to start without a pre-pass, you might want to disable this option.
Opacity Diagram – This diagram specifies the transparency/opacity at given point as a function of the channel selected in the Based on parameter. The selected channel's data range is denoted by a blue-green line.
Opacity Diagram
Specifies the transparency/opacity at given point as a function of the channel selected in the Based on parameter.
Opacity – The opacity of the smoke is determined by the function represented in the diagram control below the color gradient when the Based On Mode is set to any channel other than Simple smoke. Along the X axis is the value of the selected source channel (Temperature, Fuel, etc.).
Expand – When a graph is displayed, click this button to open a resizeable pop-up window showing just the graph.
Diagram and Gradient controls
The following controls can be used in the color gradients and diagrams:
Double click – Creates a new point or changes an existing one.
Left button drag – Moves the selected point(s).
Left button drag over the left or bottom rulers (diagrams only) – Scale the diagram in the corresponding direction.
Middle button drag over the background – Drags the visible area. If the Ctrl key is pressed, the background can be dragged instead, thus transforming the diagram.
Mouse wheel – Zoom in/out. If the Ctrl key is pressed, the zoom will occur on the background instead, thus transform the diagram.
Right click – Brings out a drop-down menu where points can be added, edited, or deleted, fit the entire diagram or gradient into the view, clear the diagram, and load and save the diagram it to a file.