Standalone Denoise Tool | vdenoise
This page contains information on the V-Ray standalone denoising tool.
Page Contents
Overview
The V-Ray installation includes a standalone denoising tool called vdenoise that can be used to denoise still images or animations outside of 3ds Max. This is especially useful for animations because the standalone tool can look at multiple frames at once and produce a better denoising result. The vdenoise tool works with either .vrimg or multichannel OpenEXR files and writes out files with the same format. You can write those files out of 3ds Max through the V-Ray raw image file output options in the V-Ray Frame Buffer rollout.
Installation
The vdenoise tool is a part of the V-Ray for 3ds Max installation and can normally be found in the folder C:\Program Files\Chaos Group\V-Ray\3dsmax Rx for yyy\tools. You can quickly open a command prompt in the folder where the vdenoise tool is located from Start Menu > Programs > Chaos Group > V-Ray for 3ds Max > Tools > Denoiser tool.
Generating the Needed Render Elements
The denoiser needs several render elements in order to work optimally. The easiest way to generate these render elements is to add the VRayDenoiser Render Element to your 3ds Max scene.
Required Render Elements
The required render elements are listed below. Add the VRayDenoiser or Denoiser Render Element to your scene to generate the necessary render elements automatically.The standalone denoiser will still run when some or all of these render elements are missing, but results might be too blurry.
For single pass RGB denoising:
-
Noise level (named noiseLevel) - The denoiser relies heavily on this render element to provide information used during the denoising operation.
-
Defocus amount (named defocusAmount)
-
World positions (named worldPositions or wpp)
-
World normals with bump mapping (named worldNormals)
-
Diffuse filter (named diffuseFilter or VRayDiffuseFilter)
-
Reflection filter (named reflectionFilter or VRayReflectionFilter)
-
Refraction filter (named refractionFilter or VRayRefractionFilter)
Additional render elements for multipass per-render elements denoising:
-
Atmosphere (named atmosphere or VRayAtmosphere)
-
Background (named background or VRayBackground)
-
Global Illumination (named globalIllumination or VRayGlobalIllumination)
-
Lighting (named lighting or VRayLighting)
-
Reflection (named reflection or VRayReflection)
-
Refraction (named refraction or VRayRefraction)
-
Specular (named specular or VRaySpecular)
Denoising Still Images
To denoise a single .vrimg or .exr image, use the following format for the command:
vdenoise -inputFile="path\to\image.exr"
where path\to\image.exr is the path and file name of the .vrimg or .exr file that you want to denoise.
For example, if the file you want to denoise is called render.exr and is located in the folder c:\renderoutput, the full command will be
vdenoise -inputFile="c:\renderoutput\render.exr"
Denoising Animations
To denoise a sequence of images, you must have all frames already rendered, as the denoiser needs to look at several frames at the same time. Use the following format for the command:
vdenoise -inputFile="path\to\sequence_????.exr"
where the question mark (?) replaces the digits in the sequence's file names.
For example, if the images in the sequence are named anim_0001.exr, anim_0002.exr, etc. and are located in the folder c:\renderoutput, the full command will be
vdenoise -inputFile="c:\renderoutput\anim_????.exr"
Denoiser Options
You can control the denoiser through optional switches on the command line. To list all available options in the command prompt window, run the denoiser without any arguments (vdenoise command) or use the -help switch:
vdenoise -help
The table below shows the optional switches, which are also displayed by the vdenoise -help command. To use a switch, precede the switch with a hyphen (-) and follow it with an equals sign (=) and the desired parameter, as shown in the table.
|
Switch |
Description |
|
-inputFile="<fileName.exr>" |
Specifies the input . vrimg or .exr file. Can contain paths and wildcards such as a question mark (?) to indicate digits in file names. Examples: vdenoise -inputFile="c:\renderoutput\render.exr" - Denoise a single image named render.exr located in the c:\renderoutput folder. Note that in order to denoise a sequence of images you must have all frames already rendered, as the denoiser needs to look at several frames at the same time. |
|
-mode=strong|default|mild |
Sets one of three predefined presets for the radius/threshold/noise level multiplier. |
|
-elements=0|1 |
Specifies the method for denoising render elements. |
|
-boost=0|1|2 |
Boosts the effect of the selected preset. |
|
-skipExisting=0|1 |
Determines the file-processing behavior when a corresponding output image already exists. |
|
-frames=bN[-eN[,sN]]{;bN[-eN[,sN]]} |
Specifies the frames and/or frame intervals to process. |
|
-display= 0|1 |
Specifies whether to display a preview window with the denoising result. |
|
-autoClose=0|1 |
Specifies whether to automatically close the preview window after denoising is complete. |
|
-useCpu=1 |
Forces usage of CPU version even if OpenCL support is found. |
|
-useGpu=0|1|2 |
Specifies when to use GPU (OpenCL) or CPU version for denoising. |
|
-verboseLevel=0|1|2|3|4 |
Specifies the verbose level of information printed to the standard output. |
Advanced Options
|
Switch |
Description |
|
-abortOnOpenCLError=0|1 |
Specifies the behavior of the denoiser when an error is encountered while attempting to use OpenCL. |
|
-strength=N |
Sets the strength of the denoising based on the noise present in the noiseLevel Render Element. Larger values remove noise more aggressively but might blur the image too much. This is the main parameter for controlling the level of denoising. The default is 1.0, which uses the noise in the noiseLevel Render Element as is without adding any additional strength. |
|
-abortOnOpenCLError=0|1 |
Specifies the behavior of the denoiser when an error is encountered while attempting to use OpenCL. |
|
-strength=N |
Sets a value for the strength of the denoising based on the noise present in the noiseLevel Render Element. Larger values remove noise more aggressively but might blur the image too much. The default is 1.0, which uses the noise in the noiseLevel Render Element as is without adding any additional strength. |
|
-radius=N |
Specifies pixel radius for denoising. Larger values slow down the denoiser but might produce smoother results. The default is 10 pixels, which corresponds to the Default preset. |
|
-frameBlend=N |
Specifies the number of adjacent frames to use when denoising animations. Higher values help reduce flickering between adjacent animation frames. The default is 1, which uses one frame before and one frame after the current frame. |
|
-oclquery="<string>" |
Explicitly specifies which OpenCL devices should be used for denoising. Examples: |
|
-strips=N |
Forces image to be split into N strips for processing. The default is -1 (negative 1), which uses an algorithm to automatically determine the optimum number of strips. |
|
-autoRadius=0|1 |
Specifies whether to automatically adjust the denoising radius based on the level of noise present in the noiseLevel Render Element. |
|
-threshold=N |
Specifies a threshold for denoising when the noiseLevel Render Element is missing. This value is typically equal to the noise threshold for antialiasing in V-Ray. If this switch is not set, the denoiser relies on the noiseLevel Render Element and a threshold of 0.001 is used. |
|
-memLimit=N |
Forces the GPU memory usage limit to N gigabytes. The default value of 0 specifies that all available memory be used. |
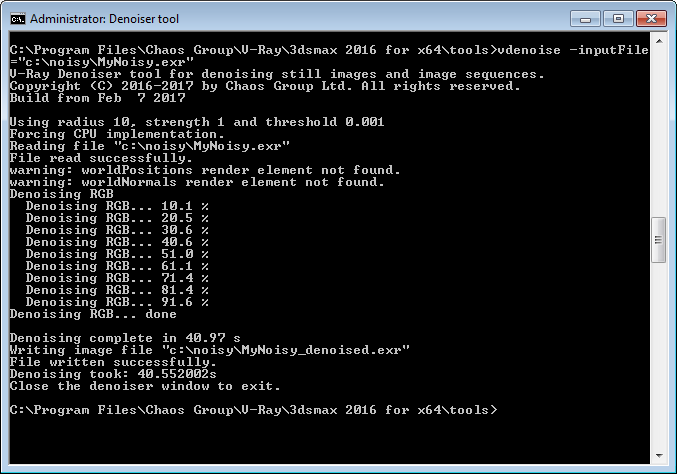
Output
When the standalone Denoise tool is run in the command prompt window, it outputs information about the process, including settings, warnings, progress, and files written.